SEC602 – LAB 13 / Using an Intrusion Detection System

In this lab, we will will position an IDS sensor to monitor packets on the LAN router’s “Internet-facing” interface. We will use the Security Onion Linux distribution and its bundled Snort IDS as the sensor. We have to adjust port mirroring settings in Hyper-V to allow the sensor to receive traffic arriving on the router’s 172.16.0.254 interface.
we will need the following virtual machines for this lab: KALI, WIN2016-DC, SECONION and WIN2016-MS.

EXERCISE 1 – OBSERVING SERVICE ACCOUNTS

We have to configure the VM’s according to the diagram provided. After configuring the VM’s. After that I opened SecOnion VM and logged into Administrator account with same credentials.

Screen Shot 2018-10-14 at 10.41.33 PM.png

Whenever i was trying to loggin into the account it was giving me the error INVALID LOGIN / PASSWORD.

Screen Shot 2018-10-14 at 10.54.02 PM.png

For the next steps it does require me to run the application and ping and test the networks and go back and forth in SECONION frequently using that specific application.

Problems

  • First of all i couldn’t find mirroring mode for the switches as the lab mentions to do, i still remember that for the last lab which required similar port mirroring thing, i have used INT03. Maybe that could have a possible solution but it doesn’t seem like it.
  • The SECONION decided to keep me in misery, changing the password itself. Tried the exact same password said multiple times as mentioned in the lab instructions but it didn’t work. Surprisingly, after having a look in the lab i found that SECONION plays a major role in this lab if i haven;t got that sorted then i couldn;t do anything. There is no time to ask for help right now at this time being.

SEC602 – LAB 10 / Using Account Management Tools

In this lab we will explore the use of different kinds of account for managing objects in Active Directory and the use of GPO to apply account policies.

we will need the following virtual machines: Windows 2016-DC turned on and the rest of them when prompted Windows 2016-MS, Windows 10-WS, Windows 7-WS and RT-LAN turned on.

Exercise 1 – Observing Service Accounts

Lets open a connection to windows 2016 DC and install the following program

Close the Process Explorer now.

Exercise 2 – Browsing Default Active Directory Groups and Users

Now we will observe some of the accounts created by default in AD of Windows 2016 DC server.

In the “Active Directory Users and Computers” console, we went into classroom.local and had a look in bulitin folder. This folder contains default security groups specific to managing Domain Controllers.

After that we expanded Users folder which contains security groups and user accounts. These default groups and users are for access and management of other domain computers.

then we had a look on Domain Admin group when into properties > Members of the group and found that “Administrators” were locally scoped account from the “Builtin” folder.

Exercise 3 – Securing the Administrative Accounts

Now we will implement some Microsoft best practices for securing administrative accounts and learn
how not-such-best-practice can compromise organizational security.

I have opened CMD and wrote command “whoami /user” to view the SID of the current domain user – the format of SIDs can reveal a lot about the type of account. In the image below, it shows the Security ID (SID) of the current domain user. Note the “-500” suffix.

After that we had a look into Active Directory Users and Computers right clicked into the Administrator account and select Properties > Members Of tab to note the members.

Then General Tab again and we will delete the text of description field and enter “Andy”  as first name and “Smith” as last name. Then rename Administrator to Andy.

then I logged off and Singed back in as classroom\Andy with same password. After that i went into Active Directory Users and Computer and went into Users container, created a new Organizational Unit in the name box we will name it “UsersOU” and creating another Organizational Unit naming it “AdminOU”  and then from Users group we moved Domain Users, Sales, Sam, Viral to “UsersOU”.

Also moving Andy, Bobby, Domain Admins, LocalAdmin accounts from Users to AdminOU

then inside AdminOU we created a new Administrator account after that we opened CMD and ran “whoami /user” command it showed Andy as the user and still -500 suffix at the end which might mean Administrator. Then we ran the following command to get sid for Administrator account (which doesn’t have admin privileges)

later on i found out that The format of SIDs represents the type of an account.  So next I Delegated control of the UsersOU for the Regular account ‘Sam’.

Exercise 4 – Investigating Group Policy

Continuing in WIN2016-DC we will go into Group Policy Management expanding Forest > Domains >
classroom.local > ComputersOU container then in Local Admin Policy we went into settings tab and Added the page to the browser’s Trusted Sites zone.

After that we will create a GPO in this domain naming Audit Policy. Then editing the policy and configuring inside making “Audit: Force audit policy subcategory settings.” Enable.

Also, after that going into Advanced Audit Policy Configuration under Security Settings in GPM Editor; editing Audit File System setting checking on Success & Failure boxes.

then I went into Group Policy Modeling Wizard by right clicking on Group Policy Modeling. and following the steps.

Then Skip to the final page and click Finish. After that going into Details tab and making sure the audit policy is applied under Computer Details > Settings > Policies.

switching back to Active Directory Users and Computers, add a new user group inside AdminOU called “sec-glo-priv”

Then going into Active Directory Administration Center to specific password requirements for users in AdminOU and specifically for “sec-glo-priv” group which we just created.

Exercise 5- Configuring Users and Groups

In this exercise, we will use the new permissions that we allocated to Sam’s account to configure user and group accounts and explore some of the restrictions imposed by avoiding the user of an “all-powerful” Administrator account.

Now we can start WIN2016-MS, WIN10-WS, and WIN07-WS VMs.

Logging into WIN10-WS VM as SAM. and then we will navigate into Computer Management > Expanding Local Users and Groups > Select Users container

This shows user accounts local to the computer only. These accounts cannot be used to access domain resources.

Now going into the group container > Administrator (Properties). Now to test the permissions we have on the local machine, we will try to add Sam.

Q. In the “Administrators Properties” dialog, click the Apply button – does it work?

No, it didn’t work gave error: Access is denied.                     

After this we went into Device Manager and Disk Management to acknowledge the warnings.

we are getting these errors because This user account does not have local administrator privileges / rights to perform the actions.

Now we will try to connect another computer WIN2016-DC.

Q. Can you access any of the snap-ins?

No, i can’t unfortunately.                                                  

The lab mentions using RSAT (Remote Server Administration) because it allows a user with appropriate privileges to configure domain properties and remote server services without logging on the local server or DC.

Clearly the Sam account cannot manage the DC
server itself, but we only need it to be able to manage accounts in the UsersOU container.

We will try to add a new user “Jo” into UsersOU through Active Directory Users and Computers through WIN10-WS.

And now we will modify few containers, in UsersOU we will modify Sales object > sec-glo-sales. Making sure that the group is globally scoped and accounts and Sam and Viral members are still present.

Now we will add “sec-dlc-share-sales-change.” and “sec-dlc-share-sales-read.”  groups in UsersOU then we will add “sec-dlc-sharesales-change” in “sec-glo-sales” group.

then we will go into sec-dlc-shares-sales-read object’s > Properties > Members tab > Add (Domain Users)

Now we will go in AdminOU container and try add some members in Domain Admins object but Add button is disabled.

It basically reflects that still the standard user has restricted access to change few settings as being standard user.

Exercise 6 – Configuring a File Share

In this excersise, we will use an account that has been granted local administrator privileges over all the VMs
except the DC to configure a file share.

Loggin back in WIN2016-MS as classroom\Bobby

We will go into c: drive and create a new folder named SALES, and changing its Advanced sharing setting. Allowing for Everyone and checking all Allow boxes.

This gives the widest possible permissions to anyone accessing the share over the network.

Now going into the Security tab > Advanced button.

Now we will remove those custom Users one by one. and Add > “sec-dlc-share-sales-change” (Enabling Modify Permission in “Permission Entry” dialog) & “sec-dlc-sharesales-read”

Going into Auditing tab > Adding Auditing Entry for Sales folder with custom permissions naming “Success” & “Fail”.

Now heading to Effective Access tab, adding Andy as user and checking Effective Access for him.

CT&A

I can see that this lab clearly wanted show that how nesting groups is making administration simpler and less
prone to error.

also, i can see that the job of administrator is quite spontaneous managing accounts, configuring separate account with all the admin privileges, managing users and groups even their permissions is crucial. I also found that creating groups and managing specific groups with certain permission makes management efficient not only passwords but File sharing too.
 

SEC602 – LAB 8 / Deploying Certificates and Implementing Key Recovery

In  this lab, we will will configure a key recovery agent. Note that you should always set up the key recovery agent before issuing certificates. The archived private keys are encrypted using the public keys of each key recovery agent. If an agent is added later, he will not be able to decrypt keys that have already been archived.

we will need the following virtual machines: Windows 2016-DC,  Windows 10-WS and RT-LAN turned on.

EXERCISE 1 – Configuring a Key Agent

We will begin with Windows 2016-DC.

So i wasn’t going any further with this Edge browser so i have to try on IE and voila it worked. But partially then after seeking more help i found that i need to add it as trusted site to get those options and then i did got it.

Switch back to the WIN2016-DC VM. and Issue the certificate,.

Now lets go back to Windows 10 and Install the Certificate.

Switch back to Win2016-DC and go into the classroom-CA > Properties and Add the certificate

The final step of this task was to configure the CA with the recovery agent details. This was done in the Windows 2016 DC > Server Manager > in the Certification Authority.

EXERCISE 2 – Deploying User Certificates

The intention behind this exercise is to identify the difference in tasks where the certificate has to be applied manually and through group policy we ensure that only valid users receive certificates and issue them automatically. In order to do that we need check this on auto enroll.

After that we have to issue a new Certificate Template in order to auto enrol users through Group policy.

We have ticked the renew expired certificates and update them automatically which makes it smooth for us.

EXERCISE 3 – Using the Encrypting File System (EFS)

We will here use the account of an ordinary domain user named Sam, who will encrypt some private documents and then get into a bit of a situation to help us understand the concept of EFS. It uses a symmetric key called the File Encryption Key (FEK) to bulk encrypt and decrypt data files.

To ensure that the FEK is only accessible to the authorized user, it is encrypted using the public key in the user’s certificate. This means that the linked private key must be present to decrypt the FEK and use it to decrypt the data again.

So we will log into Windows 10-WS in classroom\SAM user account, create a subolder inside the LABS called “SECRETS” and then i went to the properties for the folder to enable encrypting.

As the lab mentions to take note of the certificate thumbprints:

Then go into MMC. and check whether the thumbprint matches or not and yes it does match.

After that we have closed that dialog box and exported that certificate. Then deleted the SAM certificate. The lab mentions to signout and sign back in the sam account then trying to access the files which i couldn’t it gave me this error message.

EXERCISE 4 – Performing Key Recovery

In this exercise, we will pretend that the exported key was in a usb stick and its lost now, so we have to recover the encrypted key through this exercise. Lets get into it.

In Win10 Machine, Signing into the classroom\Administrator account to get the access but without the key even administrator cannot view encrypted files. So we will switch back into Windows Server 2016 to do the recovery. When i check in CA, i find that even sam deleted the certificate he was auto enrolled again but the new certificate cannot open the encrypted files!  Well he can’t copy the the key because its thumbprint is different / unique. In order to retrieve that we will run cmd and follow few commands.

Tried getting help but i’m not sure why i couldn’t do it. They troubleshooted but couldn’t help me so i left from here.

CT & A 

The main purpose for the lab was to create a scenario in which you secure your files and documents from specific users if the key or certificate has been deleted or tampered then it demonstrates how to recover the certificate / key which can be quite difficult sometimes but you should know how to obtain that. It is really important to know how to do and recover the key.

Problems

Few problems i had with this lab but i found solutions to them which was adding that local site as trusted site as mentioned earlier and also learned if the local website doesn’t work in the recommended browser then you might have to try something old school (IE browser) to resolve the problems. The main part was the end part of lab where i have to retrieve the key through CMD but somehow it didn’t worked for me mystery unsolved but i’m sure i follow the guide and do the lab again i can do it.


SEC602 – LAB 7 / Implementing Public Key Infrastructure

In  this lab, we will explore the properties of different kinds of digital certificates and use Windows to request, issue, and revoke certificates.

we will need the following virtual machines: Windows 2016-DC, Windows 2016-MS, Windows 10-WS and RT-LAN turned on.

EXERCISE 1 – Exploring the Certificate Server 

Now lets switch into Windows 2016-DC and go in Server Manager > Tools > Certification Authority

and then view the certificate, note the root certificate (“Certificate #0”). Note also the identity of the cryptographic provider (“Microsoft Software Key Storage Provider”)

Now examine all the fields and we looked on each field and from the Lab file understood what each field meant.

After that Close that dialog box and click on Extensions tab. Note the locations of Certificate Revocation Lists (CRLs).

Then Close the dialog box and then In the “Certification Authority” console, expand the server classroom-CA to view the subfolders.

Now, Select the Certificate Templates folder.

EXERCISE 2 – Requesting and Revoking Certification 

In this exercise, we will request a certificate for the WIN2016-MS member server and use it to configure a secure web service. Then we will explore options for revoking the certification.

Now lets switch to Windows 10-WS in classroom\Administrator account and open run dialog, type https://win2016-
ms.classroom.local and click OK.

Now let’s Switch to the WIN2016-DC VM and observe the web server certificate in the Issued Certificates folder.

Now, Press Start+R to open the “Run” dialog then type certsrv.msc /e and press Enter. See what happens

After that switch to WIN10-WS VM and go to https://updates.classroom.local again. Is any warning displayed? NO error displayed

CT & A 

The main purpose for the lab was to create a scenario in which you secure your files and documents from specific users if the key or certificate has been deleted or tampered then it demonstrates how to recover the certificate / key which can be quite difficult sometimes but you should know how to obtain that. It is really important to know how to do and recover the key.

Problems

Few problems i had with this lab but i found solutions to them which was adding that local site as trusted site as mentioned earlier and also learned if the local website doesn’t work in the recommended browser then you might have to try something old school (IE browser) to resolve the problems. The main part was the end part of lab where i have to retrieve the key through CMD but somehow it didn’t worked for me mystery unsolved but i’m sure i follow the guide and do the lab again i can do it.


SEC602 – LAB 4.2 / USING Network Scanning Tools 2

In this lab we will examine communications between hosts running on the local network.

In this lab we would be utlising, RT-LAN, WIN2016-DC, Kali Linux, and WIN10-MS operating system.

EXERCISE 1 – Configuring the VM’s 

First of all we have to configure VM of Windows 2016-DC.

Instead of configuring our VM’s on Mirroring mode we have one dedicated promiscuous switch (INT-03) which has been given permissions.

and we have to repeat the same steps for Windows 10 and KALI OS.

Now lets open KALI VM and got to network settings and we will enter following network configuration.

EXERCISE 2 – Using Wireshark 

In this exercise you will capture some network traffic and identify the main features of the Wireshark network analyzer.

We have to open wireshark program and identify/capture various ip addresses.

Above we have observed various fields such as Frame, Ethernet II, IPv4, User Datagram Protocol, DNS, SMB2 frame and various TCP Streams.

After that few have to select any SMB2 frame and right click and follow the TCP Stream

EXERCISE 3 – Examining Unsecured Traffic 

In this exercise, we will examine the risks involved in unsecured network traffic.

Now lets get into Windows 2016 DC, go into c:\ root folder, lets create a new subfolder called secret and create a new txt file named Confidential.

and now we will enter the following text: The password is Courage! Save and then close.

Now we will go into File and Storage Service > Shares and then we will aim to share that secret folders and share the secret$ folder.

Now we will switch to Kali-Linux VM and perform new capture. After that we will open a new connection window from WIN10-WS VM and sign in as classroom\Administrator

Then Open a Run dialog (Start+R) and enter \\WIN2016-DC.

Question asked: Does Secret$ share appear?

Ans: No, it has not appeared.

After that in the File Explorer bar we have to enter \\WIN2016-DC\secret$

Switch Back to Kali and click on Stop Capture button. After that enter “NetShareEnumAll Response” or “SRVSVC” in the description field to sort the one’s which server uses to send its share list to the client.

EXERCISE 4 – Using Netcat 

Now, Let’s imagine that a rogue administrator wants to exfiltrate this confidential data file and has installed a backdoor to facilitate this (we’ll leave aside the question of why this file might be important when he has a whole domain controller to exploit). In this exercise we will use Nmap’s version of Netcat (ncat.exe).

Now lets get into KALI VM and perform a new capture.

After that let’s switch to Windows 2016 VM and begin the transfer.

Now switch to windows 10 vm and open command prompt and Run the following commands to try to connect to the listener and download the file.

That command didn’t ran so now we will do another quick test via netstat -abp TCP in Windows 2016 – DC / Server VM. Write which port it was listening to: 127.0.0.1 (in my case)

After that we will run few commands to open the port on Windows Firewall:

CT & A 

The lab try to demonstrate that these simple tools are easy to detect. Cyber adversaries require a much more sophisticated toolkit to bypass firewalls and perform data ex-filtration covertly (or target a company with no monitoring controls).

Problems

last few steps didn’t work tried few times to transfer the confidential file and before then adding the netsh command and doing few other things to make sure the file transfers but it didn’t. So i left after spending good amount of time to resolve and moved on to next lab.


SEC602 – LAB 4 / USING Network Scanning Tools 1

In this lab we will test few software’s, tools and utilities to show our understanding on using appropriate software tools to assess the security posture of an organization.

In this lab we would be utlising, RT-LAN, WIN2016-DC, Kali Linux, WIN2016-MS, WIN10-MS and WIN7-WS operating system.

EXERCISE 1 – Scanning the local subnets

First of all we will work on Kali Linux and do few things, lets have a look:

It mentions to do the IP configuration as we did in our previous labs so i won’t repeat it. In order to find out how i did the network changes, have a look on second lab.

After that it mention to run terminal in linux and run following commands.

  • Run ifconfig to verify our ip address:

  • then run ip a command to show the same info using the newer “ip” tool (mentioned in lab)

Now, we are advised to run arp -a command to check whether we have any other hosts local to this subnet in it.

Run ip neighbor to show similar information using the newer “ip” tool:

Now, Run netdiscover -h to view the help page (just for our self understanding of different commands available in the netdiscover utility )

after that we ran netdiscover -i eth0 -r 10.1.0.0/24 where the scan results showed us various number of other hosts connected to LAN switch.

That’s all good, now press Q to quit the Netdiscover report.

EXERCISE 2 – Scanning a Host

Our next step is to find out more about other tools and hosts on the subnet. We are aimining to discover a Default gateway, DNS server, Whether any network directory / authentication and application servers are present, Whether any host / client access devices are present and Whether any other types of device (embedded systems or appliances) are present.

Now, we will run following commands in terminal were we were before:

Run ip route show:

Because the network uses DHCP to provide client addresses, the local machine has been
configured with a default gateway address automatically.

Now the lab mentions to type and run nmap -sS 10.1.0.254

So, what happened in the screenshot above si that when we ran that command instead of showing the alive hosts (expected answer), we got that the hosts are down try another command instead of –sS try -Pn, i tried that as well but same result. (which can be viewed above) So, i have tried to reset the network connections and reset the VM’s and done the whole process again but still gave me the same error. Then, i thought to move on with the next steps in the lab. Maybe later on i will encounter what i have really missed or it was intentional answer.

After doing a bit of councelling with mighty Robin, he menioned make sure all of the VM’s are turned on and connected to same LAN Network, and i found that they were turned off and then my WINMS Machine wasn’t turning on for some reasons. so mark has to clone a new system.

After that i got the exact same resuslt.

Now, the next step is to run nmap -A 10.1.0.254

EXERCISE 3 – DNS Harvesting

An organization needs to make some information about its network – such as the identity of web and email servers – public. Misconfigured DNS services can allow an  adversary to discover a huge amount of information about a private network however.

This performs a reverse lookup on the default gateway. No record is found (there is no
reverse lookup zone configured) but note that the server answering your queries is
10.1.0.1.

EXERCISE 4 – Zenmap

In this excersise, we will explore Zenmap which provides a graphical interface to Nmap and makes it easier to view reports and visualize the network topology.

Open Zenmap and enter network address 10.1.0.0/24.

Click on Topology tab to view the network.

The Topology tab shows each host on a certain ring, representing the number of hops distance from localhost (the scanning host). For this scan, all the hosts are local to one another so there is only one ring.

Now click on Ports / Hosts to view the ports.

If we have a look carefully: The 10.1.0.1 is a domain controller! As well as HTTP and DNS, the TCP ports are for directory queries (LDAP), authentication (Kerberos), and file / printer sharing plus remote monitoring and administration.

And, 10.1.0.2 was identified as a mail server in the zone records and Nmap has identified the hMailServer application listening on SMTP (25 / 587) and IMAP (143) ports. It is running Microsoft’s IIS web server though and Nmap has correctly identified it as version 10.

The 10.1.0.10x – these are the Windows client versions with DHCP-assigned addresses.
The ports for file / printer sharing are open. You might see port 5357 open (if Network Discovery is enabled). This port runs a service called Web Services on Devices and the 10.1.0.254 is the router which we identified earlier.

Now, click on Host Details tab, it shows the summary of OS detection results for each host.

#Done


SEC602 – Lab 3 / Using Vulnerability Assessment Tools

This lab is designed to test our understanding and ability to apply content examples in the following CompTIA Security+ objectives:
– Vulnerability scanning concepts.
– Given a scenario, use appropriate software tools to assess the security posture of an
organization.


In this Lab we would be using WIN2016-DC, Kali Linux, WIN2016-MS, WIN10-WS & WIN07-WS Systems.

Exercise 1 – SettingUp OpenVAS

We have to run OpenVAS scanner from Kali Linux VM. So, going into KALI VM:

Making sure that it connects to the VLAN by checking the Network Adapter:

then logging into the machine using root and default password as the login credentials. Now we have to configure the adapter using the DHCP server on the LAN Network in Kali:

It mentions to go into IPv4 and select Automatic IP Address and delete any present DNS Servers.

Then we should be able to see an IP address in the range of 10.1.0.000 (and we got here 10.1.0.100)

After getting the IP address in that range, we have to open Terminal and run OpenVAS -start to run that program which is pre installed in Kali Linux VM. then Exit the terminal.

Exercise 2 – Configuring OpenVAS

In this exercise, we have to configure target groups and scanning options in the OpenVAS scanner in Kali Linux.

We have to then open Firefox and go to 127.0.0.1:9392 and log on with the Kali login credentials.

Then we have to go into the Credentials and open new credentials and create one classroom\Administrator credentials to login.

Now, after we finish that we have to go into Configuration menu and select Target. Again star icon and add a new target.

After that then we have to go into Configuration menu again and select Scan Configs.

Now from Configuration menu we have to select Schedules and same as before click on Blue star to open the New Schedule web dialog.

From Scans Menu we have to select Tasks and add a new task:

So after creating that Task you have to go into the task and run it. When we will click on start button the run the scan manually the next scheduled task would be tomorrow.

Exercise 3 – Using MBSA

In this excersise we have to run Microsoft Baseline Security Analayzer in Windows 10 VM.

Log in into classroom/Administrator in WIN10-WS, then we have to run MBSA from the command line to use an offline updates catalog as VM is not connected to the outside world in the VM. Entered the following commands as show in images below.

 When the second scan finishes open MBSA from desktop app and then click on View existing security scan reports.

WIN10-WS

I can clearly see from the logs that Windows Automatic Updates failed! and then the lab mentions to click on Result details link for the Windows Security Security Updates category. but we don’t have it further it talks about if we could have a Internet access on the HOST, and then do a quick search on the Knowledge base article for the missing patch and identify the CVE ie. addresses.

WIN2016-DC

The DC also has a serious security policy failing by allowing guest account access. This
facilitates remote scans by unauthorized hosts and provides potentially exploitable access to the file system, which is completely unacceptable on a server running a service as
critical as Active Directory.

Exit WIN10-WS. 🙂

Exercise 4 – Analyzing OpenVAS Scans

We will go back in KALI-VM and refresh the browser and go back to greenbone web app Dashboard.

We will go to Scans > Reports. Open the Task.

Then we will filter it down only for hosts=10.1.0.1 and the results can be seen below;


we can identify that the 445/tcp SMB/NetBIOS Null Session Authentication Bypass vulnerability this is a result of the guest access / anonymous logon configuration identified by MBSA. also there is one “general/tcp” type critical vulnerabilities.

After that, now lets filter it down for cve-201-0199 as the labs mention we couldn’t find any vulnerabilities.

CT&A

Through this Lab we have identified multiple ways to find out whats happening on the network, through CMD and advance tool such as Zenmap & OpenVAS in KALI Linux environment but we can do it Windows environment easily.

Problems

None


SEC602 – Lab 2 / Malware Types

Alright, the part and art of doing the blog is interesting and going through Skillpipe and following the labs here is my progress on what I have done.

Exercise 1 – Activating a Trojan

Before i begin, i have to run the following command in PowerShell:

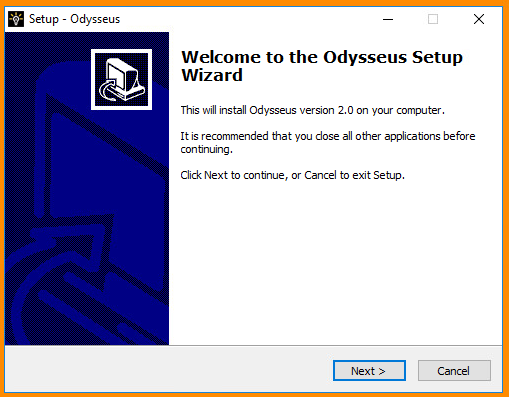
  1. Install the threat program provided in LABFiles folder, running and executing the setup.exe and following the instructions.

ysllch

2. Eventually it installs the mine game which we used to have in old days in our windows xp computers.

eihnz7.png

3. But interesting enough without i found it strange the game with a custom name of Odysseus. When I followed the lab’s instruction in order to find something strange by having a look on task manager at first but i can’t see anything. Until i went to details and found an unusual program called “nc” which I can’t understand what it’s doing there.

courla1

4. At this stage, I’m not sure what that program is? I think this might be some virus. But following through next steps mentions checking the Event logger and have a look onto the Windows Logs and view the Applications and System logs.

–> In Application section, i found an error whether its relevant or not.

9ubdtz

–> In System logs, everything looked alright.

mod4ol

5. The next step was to check in Windows Firewall and check under advanced settings > View Inbound Rules whether something has changed or anything unusual. And I found that there are plenty of Red Stop signs which indicates that the request of Network Timestamping, redirection of ICMP v4 & v6 and Address Mask requests has been blocked but Echo requests have been allowed. The red cross on those things I found it unusual.i9c3eo

Later on, I found  that The “Odysseus” software has installed backdoor application called Netcat on the computer. This runs with the privileges of the logged-on user (currently administrator) and allows remote machine to access the command prompt on CLIENT. In this exercise, we will use the ROGUE VM to exploit the backdoor.This contains numerous penetration testing and forensic tools.

Exercise 2 – Exploiting the Trojan

So exercise 2 is about finding the exploit and scanning through your Windows 7 VM using Angry IP Scanner program on our WIN07-WS\Admin machine. I installed IP Scanner program and opened it. As it mentions to run a scan by pressing start and after scan has finished I got the following result.

After doing that we re-scanned IP addresses and we found the 4450 IP which was the open port which we were looking for. Noting down that IP Address and others as well.

Then we have to run putty to diagnose the issue.

Now we have to run few commands mentioned in the LAB guide to find out what privileges we got currently.

Basically in this commands we went into that machine and created new user called “mal” done we tweaks (adding some reg key and enabling remote desktop) and then we tried to kill on process named msmpeng.exe (which is windows defender) but we can’t because we need to obtain system privileges to do that. so now we Remote desktop into WIN10-WS machine.

Now we will get into WIN10-WS machine through RDC.

Exercise 3 – Blocking the Trojan

In this exercise, we will make further investigations about the changes that the Trojan has made and explore ways to remove it.

Now we have to go in to WIN10 machine and check for ini program created by Odysseus. and record what it does.

Then we have to go in Firewall & Security > Advanced Security and disable any “Service Firewall”

Now we have to try connecting to WIN10-WS from WIN07-WS – which will eventually didn;t work now. as i think we have disabled this rule.

After that we killed “nc.exe” process from Task Manager and deleted that ini vbfile from its location.

Exercise 4 – Deploying Malware Protection

In this exercise we will use Group Policy to ensure that Windows Defender is enabled on all computers in the domain.

Now in this exercise we have to Login into Windows Server 2016 as classroom\Administrator user and open Group Policy Management.

Then we went into the navigation pane, browse to Forest: classroom.local > Domains >
classroom.local > classroom Domain Policy.

Then we edited the “classroom Domain Policy” and from that navigation pane of the “Group Policy Management Editor” window, we went into
Computer Configuration > Policies > Administrative Templates > Windows
Components > Windows Defender and we disabled it.

Also, we disabled “Turn off routine remediation” function from same method.

Now, We have to go into Real-time protection folder under the same Windows Defender folder where we are right now.

and then we sign-out from the machine.

Exercise 5 – Using the Anti-Virus Software

In this exercise, we will use the anti-virus to detect and neutralize malware threat.

We will log in into Windows 10 and sign in as classroom\Administrator and run the setup.exe in LABFiles folder.

I noticed when i installed windows defender detected a threat. The lab guide says to ignore that message.

But after that open Windows defender it will show you green bar rather than some virus cross sign which is strange.

There’s a question in that Lab Guide: Despite the notification of “protected” status, what major problem is there with this antivirus deployment?

-> I guess that the Odysseus software would have some code which by pass Windows defender even showing that something is wrong but it doesn’t treat it as major issue.

Later on the guide explains why its that.
Read the information about the threat discovered when installing “Odysseus”.
The detected item should be identified as containing a virus of type DOS/Eicar_Test_File”.
EICAR isn’t actually a virus. It’s a test string that properly configured virus scanners should detect as a virus.

Now lab mentions to run a quick scan and clear the threats.

After that lab says run a full scan which should take significantly longer.

Me: How long?

System: 35:49:35 hrs only! 😛

The we have to switch back to Windows 7 to attempt to use PuTTY to exploit the netcat backdoor again. It did work. While Defender detected EICAR it has not marked Netcat as malicious or done anything to remove the startup script that reenables the backdoor firewall exception. Security software cannot necessarily decide on its own whether a process is malicious or not.

Now we will switch back to windows 10 to block the access to netcat backdoor from firewall.

Going to Windows Firewall > Advanced Settings > Inbound Node and adding new rule under actions pane.

So basically this blocks the access from putty to here.

After doing this, i tried exploiting the backdoor again but it failed. as we have blocked it. let’s go back and wait for scan to finish.

Finally, once Windows Defender completed its full scan, it detected the ‘eicar’ virus once more along with one of the other testing applications. Then i removed the virus and its over.

CT&A

The lab demonstrates how such a normal looking game or application can contains some Trojan backdoor virus which can then get into your computer, this Lab showed that while it can be simple and easy to gain complete access to a system and they can get your information / data from your computer. If we use these tools to identify vulnerabilities.

Problems

This exercise was simply there to ensure that we un-did anything that was ‘did’ to any of the machines in this lab. This was slightly different in vSphere, however, easy enough to accomplish. I simply shut the machines down, removed them from my resource pool and re-added them the same as in class.

MUV601 – Ass.3 – Final Outcome + Reflections

How Process went:

I would really like to say that it went really easily but the reality is NO, it was difficult for me as a individual due to few circumstance i have to face. But the process of creating Machinima is fairly simple and if you have the right tools and knowledge on how to use them then it would be fluent. I managed to create my final video, and i recon i happened because of my prior basic knowledge on how to edit video and advance passion developed knowledge of Sound Designing. While i was creating the machinima, i came across alot of new ways to do the same thing differently which enhances your final output. I really enjoyed the journey of editing and creating the final sounds for the movie was great.

Final Video:

Strength:

  • Knew what to shoot, well diverse with location.
  • Having prior basic video and sound editing skills
  • Knowledge the latest video trend to engage user.
  • Prior knowledge of Sound Production & Mixing.
  • Knowing how to shoot through various angles.

Weakness:

  • Lack of Time management and process planning
  • Writing about the entire process
  • Not fully aware of how to control the camera angle in Second Life.

Learning Outcome:

  • Explored Second Life Locations and got into new groups
  • Enhanced my controlling skills in Second Life
  • Learnt new aspects of the virtual world.
  • Meeting new communities
  • Producing a cinematic production captured in the virtual world.

Conclusion

I Have increased my knowledge and skills within second life, Exploring how to use the camera controls and finding out how to reduce the lag on non-competitive computers, Hiding the icons and distractions in Firestorm viewer! I have really enhanced my skills of Communicating people, shooting videos and recording through various angles, editing into a effective cinematic and new fresh approach which meets the latest trend standard! I can now say that i have done something unsual this year, playing with a avtaar and recording a the thrid life location where people doesn’t exist in real but they do virtually!

MUV601 – Ass.3 – Problems and Issues around Machinima

In the beginning of this final project,it seems like Machinima can be done easily but the true story you would realise that it takes quite a bit of time and work in processing the final product.

I have learnt really good lessons with this course as I came across all the various stages of assignments and project which I’m suppose to finish on time. While managing, Work and study life balance sometimes you get a bit distracted on other way that you focus too much on work and leave the study on the other side as you subconsciously think of your work in your head especially when you work in IT and try to solve some problem.

Problems encountered

1. Time Management/Planning

So, the first major problem which I personally encountered was planning and proper time management. Because when you just think that you can balance the work and studies all together with your mind. You actually can’t do it. Scheduling your time for each purpose in a day, it can be on a calendar or a digital reminder on your smartphone or even sticking up a plan on your wall. It could have helped me really well that at the end I won’t need to suffer that much.

In Short, the problem which I faced was getting less time to finish my work.

2. Lack of proper resources

I have to admin that the people who were developing the machinima, found that apart from just providing few blog link. It seem like we have to research pretty much everything but ourselves and its a part of our journey of learning as further getting clarification that students have been allocated 20 hours of self-managed learning and 70 hours for assignment work which i suppose would be ourselves but all good, comes again to lack of time management.

Also, coming to a point where i realised that my laptop now doesn’t meet the current specification standards. Meaning it’s getting old and now the needs/requirement of the environment (user) has increased, where my laptop won’t run the Graphic and Animation related software that well as it’s designed for average document work but you expects too much from what you have. So, my own personal resource was lacking in itself.

3. Rendering and Converting Files

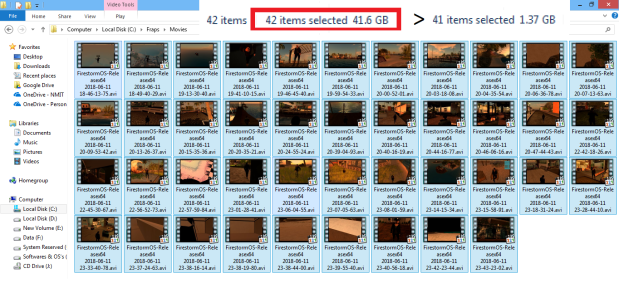
Having said that the recorded output which i had from Fraps was in “.avi” format as later on i found that it’s not acceptable by After Effects Software and it’s faced by all of the users. So, eventually the long route of converting videos worth 40GB into a valid format which After Effects takes that was the next step. Eventually, back in past i have done some video editing and conversion of formats so i knew about Handbrake Software which is use to convert videos and reduce the video size. HandbrakeHandbrake-1

42GB

Apart from that, the process of machinima went smoothly. It doesn’t mean that it was easy but it required alot of time in doing the work which includes following the storyboard and recording and shooting through various angles, editing the video properly and Designing your sound according to your story which you want to convey.

So the Solution to all of those problems which i encountered were discussed above,

Having a proper Tasklist, managing Time effectively, achieving a proper study life balance will provide me more time in researching and enhancing my content not only on this course but to my daily life.